Integrating your design with webShaper Stores Template System
A good foundation of HTML & CSS knowledge is required for this section.First step is, you need know all the template design component
On admin panel, under Design menu, you will see :
- Static Pages
- Under this menu, is where you will create all non-dynamic pages. (static pages)
Refer back description on Static Pages
- Under this menu, is where you will create all non-dynamic pages. (static pages)
- Template Files
Under this menu, contain :- Template.html
- Header.html
- Footer.html
- Leftbar.html
- Rightbar.html Refer back description on Template Files
- Theme Files
Under this menu, contain:- Images folder
- Default.css
- Skin.xml Refer back description on Theme Files
The second part, we can divide into these 3 sections
- Dynamic & Non-dynamic
- webShaper special tag
- skin.xml
Dynamic & Non-dynamic
- Dynamic part
Means, must follow system�s structure when designing the layout,
and these two are dynamic :- Plug-in Component
- Main Content Part
- Non-dynamic part
Means, can freely design it with your creativity,
and these two are non-dynamic :- Header
- Footer
Styling Dynamic Part
- Styling Plug-in Component
100% style it with CSS- Header background image in CSS
- Body background image in CSS
- Footer background image in CSS
Example: Category list component structure
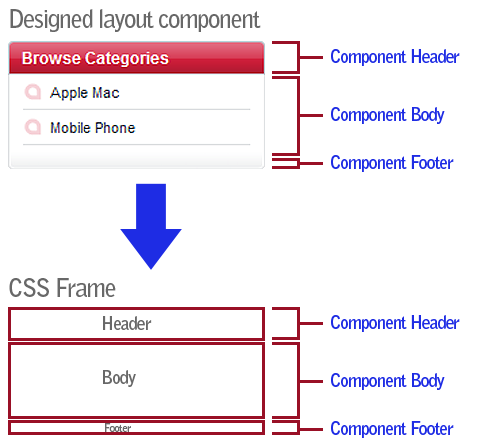
Example designed component :
- Styling Main Content part
100% style it with CSS- Front page
To style the main content part on front page, you need to style it inside
Design > Static pages > index.html - Category page
To style this page, have to follow its structure, and style it with CSS - Product details page
To style this page, have to follow its structure, and style it with CSS
- Front page
- List of Dynamic pages
Dynamic pages consist of the following pages (stored under /webshaper/store):
- addressBilling.asp
- addressBook.asp
- addressRegister.asp
- addressShipping.asp
- advancedSearch.asp
- bestSellers.asp
- browseByCustomField.asp
- cancelpayment.asp
- changePassword.asp
- contactUs.asp
- createAccount.asp
- cust_createNewShipAddr.asp
- cust_editShipAddr.asp
- cust_modifyInfo.asp
- cust_modifyShipInfo.asp
- custHome.asp
- custOrderList.asp
- emailFriend.asp
- forgetPassword.asp
- manufacturer.asp
- message.asp
- newProducts.asp
- news.asp
- newsletter_subscribe.asp
- newsletter_unsubscribe.asp
- orderSummary.asp
- payment.asp
- ProductMap.asp
- registerLogin.asp
- searchProd.asp
- shipping.asp
- sign_in.asp
- specials.asp
- thankyou.asp
- theme.asp
- verifyAccount.asp
- viewCart.asp
- viewCat.asp
- viewProd.asp
These pages do not generate the HTML directly to the browser. Instead, it generates XML data, which are combined with their respective XSL, to generate the content part of the website, which is then merged with the template files.
Styling Non-dynamic Part
You can freely style it with your creativity with HTML, CSS, Java, or Flash.
- Header Part
You can put your HTML or Flash inside header.html, ( Design > Template Files > Header.html )
and your styling css inside default.css ( Design > Theme Files > Default.css ) - Footer Part
You can put your HTML or Flash inside footer.html, ( Design > Template Files > Footer.html )
and your styling css inside default.css ( Design > Theme Files > Default.css )
webShaper Special Tag
These tag must be included inside HTML in its respective part, such as :
- <ws_companyLogo/>
This code will generate company logo, (website logo) dynamically from admin panel (Backend).
(Mostly we put this inside Header.html)
Example code :... <div id="companyLogo"> <a href="/index.asp"> <ws_companyLogo/> </a> </div> ... - <ws_companyName/>
This code will generate company name, (website name) dynamically from admin panel (Backend).
(Mostly we put this inside Footer.html)
Example code :... Copyright © 2010 <ws_companyName/> ... - <ws_companyURL/>
This code will generate company URL, (website URL) dynamically from admin panel (Backend).
(Mostly we put this inside Footer.html)
Example code :... Copyright © 2010 <ws_companyName/> | <ws_companyURL/> | ... - <title/>
This is standard HTML element, but in the final output, the values for it, would be replaced with
SEO-Friendly title between the title tags like <title>Product Name</title>.
(Can find this inside Template.html)
Example code :... <?xml version="1.0" encoding="UTF-8"?> <html doctype="XHTML 1.0 Transitional" > <head> <title/> <description/> <keywords/> <googleAnalytics/> <theme/> <link rel="shortcut icon" href="/theme/images/favicon.ico" /> <link rel="shortcut icon" href="/theme/images/favicon.gif" /> <meta http-equiv="Content-Type" content="text/html; charset=UTF-8" /> ... - <description/>
This will print out <meta type="description " content="�" >
(Can find this inside Template.html)
Example code :... <?xml version="1.0" encoding="UTF-8"?> <html doctype="XHTML 1.0 Transitional" > <head> <title/> <description/> <keywords/> <googleAnalytics/> <theme/> <link rel="shortcut icon" href="/theme/images/favicon.ico" /> <link rel="shortcut icon" href="/theme/images/favicon.gif" /> <meta http-equiv="Content-Type" content="text/html; charset=UTF-8" /> ... - <keywords/>
This will print out <meta type=�keywords� content=��� >
(Can find this inside Template.html)
Example code :... <?xml version="1.0" encoding="UTF-8"?> <html doctype="XHTML 1.0 Transitional" > <head> <title/> <description/> <keywords/> <googleAnalytics/> <theme/> <link rel="shortcut icon" href="/theme/images/favicon.ico" /> <link rel="shortcut icon" href="/theme/images/favicon.gif" /> <meta http-equiv="Content-Type" content="text/html; charset=UTF-8" /> ... - <googleAnalytics/>
This will print out the Google Analytics Web Site Statistic Tracking code.
More on Google Analytics at http://www.google.com/analytics/
(Can find this inside Template.html)
Example code :... <?xml version="1.0" encoding="UTF-8"?> <html doctype="XHTML 1.0 Transitional" > <head> <title/> <description/> <keywords/> <googleAnalytics/> <theme/> <link rel="shortcut icon" href="/theme/images/favicon.ico" /> <link rel="shortcut icon" href="/theme/images/favicon.gif" /> <meta http-equiv="Content-Type" content="text/html; charset=UTF-8" /> ... - <theme/>
This will print out <link href="/theme/default.css" rel="stylesheet" type="text/css">
(Can find this inside Template.html)
Example code :... <?xml version="1.0" encoding="UTF-8"?> <html doctype="XHTML 1.0 Transitional" > <head> <title/> <description/> <keywords/> <googleAnalytics/> <theme/> <link rel="shortcut icon" href="/theme/images/favicon.ico" /> <link rel="shortcut icon" href="/theme/images/favicon.gif" /> <meta http-equiv="Content-Type" content="text/html; charset=UTF-8" /> ... - <header/> , <footer/> , <leftbar/> and <rightbar/>
You can further divide the template into 4 major sections, header.html, footer.html, leftbar.html,
and rightbar.html. To call up that section of HTML, just insert the above tags.
(If not, you can always have only one template file -> Template.html)
Example code :... <body onload="initPage()"> <div id="wrapper"> <header/> <div id="MainContent"> <leftbar/> <div id="col1"> <div class="col1Wrapper"> <content/> </div> </div> <rightbar/> </div> <footer/> </div> </body> ... - <content/>
This section is the center section which prints the content of pages excluding those printed by
<header/>, <footer/>, <leftbar/> and <rightbar/>.
(This will generate main content dynamic pages)
Example code :... <body onload="initPage()"> <div id="wrapper"> <header/> <div id="MainContent"> <leftbar/> <div id="col1"> <div class="col1Wrapper"> <content/> </div> </div> <rightbar/> </div> <footer/> </div> </body> ... - <statCounter/>
This will print out the Statcounter Web Site Statistic Tracking code.
More on Statcounter at http://www.statcounter.com
Example code :... </div> </div> <statCounter/> </div> </footer> ... - Webshaper Plug-In component tag
These are the code for all our Plug-In webshaper component tag,
Category Listing Component <categoryListing/> Price Range List Component <priceRangeList/> Manufacturer List Component <mfcComponentList/> Theme List Component <themeComponentList/> Browse by Custom Field Component <customFieldList code="1" title="Shop by Brand" /> News Component <newsComponentList/> Currency Component <currencyList/> Cart Component <cartComponentList/> New Product Component* <newProductsComponentList/> Special Component* <specialsComponentList/> Best Sellers Component* <bestSellersComponentList/> Featured Products Component* <featuredProductsList/>
* Plug-In component which can inserted in both template files and static files, the tags are case sensitive.
webShaper Skin.xml
Skin.xml is your layout configurator. Inside this skin.xml,
You can change buttons,components, and also dynamic pages layout.
- How to change button inside skin.xml?
Let say you want to change 'Add To Cart' button, search for 'add to cart' wording, and you will find this :And then, upload your new button inside images folder ( Design > Theme files > Images )<ws_button id="btnAddToCart" src="btnAddtoCart.gif" margin="2px 3px 0 0" />
and replace this btnAddtoCart.gif source image button with your new button name. - How to customize components inside skin.xml?
We will use category component as example here.<ws_component id="categoryList" > <header> <text><![CDATA[ Categories ]]> </text> </header> <body> <categoryLevelDepth>1</categoryLevelDepth> </body> </ws_component>
- Change Componnet's header wording
Simply change the wording to your prefered wording. (See below example code)
From :... <header> <text><![CDATA[ Categories ]]> </text> </header> ...
change to :... <header> <text><![CDATA[ Browse by Categories ]]> </text> </header> ...
Result:

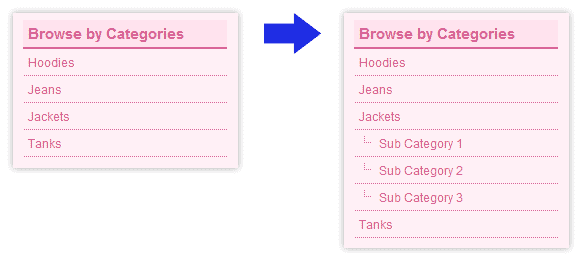
- Display sub category in category list component
If you have sub category / second level category, and you want to display it in category list component,
Simply change the category level depth to '2'.
From :... <body> <categoryLevelDepth>1</categoryLevelDepth> </body> ...
change to :... <body> <categoryLevelDepth>2</categoryLevelDepth> </body> ...
Result:
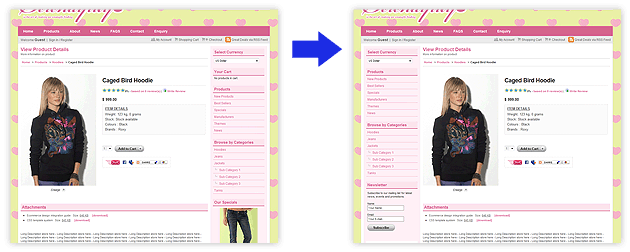
- Display leftbar or rightbar or just both
You can also configure whether you want your design to display
either leftbar or rightbar, or you can choose to display both
From :... <ws_page id="viewProd" > <pageInclude> <header>yes</header> <footer>yes</footer> <leftbar>no</leftbar> <rightbar>yes</rightbar> </pageInclude> ...
change to :... <ws_page id="viewProd" > <pageInclude> <header>yes</header> <footer>yes</footer> <leftbar>yes</leftbar> <rightbar>no</rightbar> </pageInclude> ...
Result:
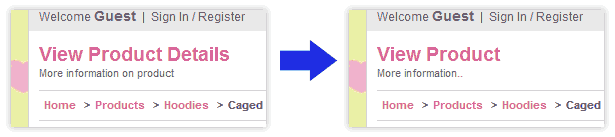
- Customize page header and sub header
You can customize every page header and its sub header inside this skin.xml
From :... <pageHeader> <imageSrc></imageSrc> <text><![CDATA[ <h1>View Product Details</h1> ]]> </text> </pageHeader> <pageSubHeader> <text><![CDATA[ More information on product ]]> </text> </pageSubHeader> ...
change to :... <pageHeader> <imageSrc></imageSrc> <text><![CDATA[ <h1>Product Details</h1> ]]> </text> </pageHeader> <pageSubHeader> <text><![CDATA[ More information.. ]]> </text> </pageSubHeader> ...
Result:
- Change Componnet's header wording
Important: HTML and CSS knowledge is required for editing the template. Before editing, please make sure to copy all the text (Ctrl A) and paste into notepad (or any documents) and save it as backup.


 Sales: +603 9130 5218
 Contact Us