webShaper Stores Quick Start Guide
Congratulations! You've made a Smart Business Investment by choosing webShaper Stores. Before you start selling online, please go through this Quick Start Guide as it will help you get started on setting up your online store Quickly & Easily. As some of you learn best by watching Interactive Flash Tutorial, most checklist below we try to provide a guided video tutorials too. Ready? Lets get started!
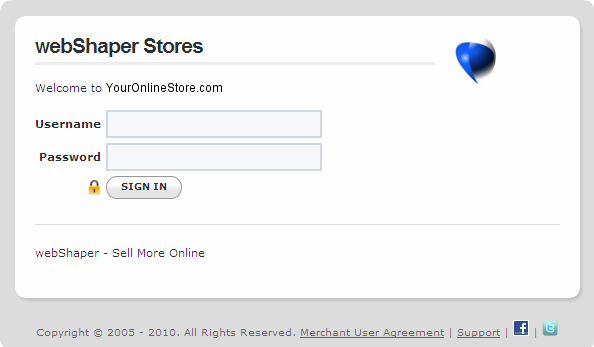
Step1 - Login to your webShaper Stores Control Panel
- Your control panel login URL will be http://www.yourstores.com/webshaper/login.asp.
- Enter your username and password to log in. You will see the Dashboard of the Control Panel.
- Click on each menu link at the Top to familiarize yourself with the system.
Step 2 - Configure & Setup all settings in "General Settings" section
- Store Setting: Put up your business logo and update your contact details.
 See Video
(Yet to have a nice logo? Check out Logodesigncreation and order your logo online for only USD $39) - Email Setting: Configure email settings (SMTP) of your e-commerce store
 See Video
( See how to download your Google Emails to Microsoft Outlook / Outlook Express )
 - Shipping Setting: Define your ship-from address to determine the shipping calculation
 See Video
- Currency Setting: Currencies type you accept for payment?
 See Video
- Inventory Setting: Prevent your clients from buying into products which run out of stock
 See Video
 - Fraud Alert System: Setup Google Map & Fraudlabs. For sohoStore / bizStore only.
 See Video
A good understanding of your visitors will help you to fine tune your marketing activities to turn more visitors into customers. In webShaper Stores, you can easily install Statcounter and Google Analytics code across your online store to track your visitor’s location, how do they find you (via what keywords?) etc.
- Track and improve your store traffic using Google Analytics
 See Video
 - Analyse and monitor all the visitors to your website in real-time using Statcounter
 See Video
![]() Please complete all the above setting before you proceed to Step 3 or else some other webShaper Store functions might not be working properly.
Please complete all the above setting before you proceed to Step 3 or else some other webShaper Store functions might not be working properly.
Step 3 - Put up your products in your Online Store
You have to properly plan your category structure of your online store. Improper product categorization can frustratates shoppers as well as Search Engines (Google, Yahoo and Bing). Search "Product categorization + Online store" in Google can give you a lot of ideas how to get your product categorization done right. You need to do this before you start adding products.
Some points to ponder:
- How many main categories are there? How about sub-categories? (Recommended not more than 3 level deep, aka Category > Subcategory > Products)

- Is every products assigned to the most appropriate category or categories? (webShaper Stores allows you to show your products on 2 categories or more )
- Does multiple categorization creating unnecessary duplicated content?
- A picture tells a thousand words, have you provided high quality pictures of your products which can help your visitors visualize (desire to have them) and zoom into the details? See e.g. below:




- Have you provided all (Yes, ALL) the details necessary for clients to make a purchase decision? Eg. If you sell fashions, your visitors want to know the size-chart details. If I buy electronics, i want to know the warranty details and the technical specification.
- Important Part: How do you make the best out of webShaper Store's SEO?
Seo Ecommerce - webShaper StoresView more presentations from Neowave. - Learn how to manage your product & categories
 Create New Categories
- Product Bulk Upload: Upload all products in seconds using Excel file
 See Video
 - Add in the products 1 by 1
 See Video
 - Display Setting: Specify how your products should display to your shoppers.
 See Video
 - Product Map: Let Your products easily indexed by Google, Yahoo & MSN
 See Video
Now it's time to load up your products - You can do it in 2 ways:
![]() Tips: It's all about serving Your Customers Needs - Pay attention to how your clients would actually look for or browse for products in your webShaper Stores. Remember, a picture (better still, a video) tells a thousand words, provide them sharp pictures and detailed information to help them in the purchase!
Tips: It's all about serving Your Customers Needs - Pay attention to how your clients would actually look for or browse for products in your webShaper Stores. Remember, a picture (better still, a video) tells a thousand words, provide them sharp pictures and detailed information to help them in the purchase!
Step 4: Create Payment Methods supported by your Online Store
Some of your customers might prefer to pay using credit cards, while others might like to pay you via online banking transfer or by using a cheque. To make the online shopping experience as easy as possible for your customers, we recommend providing multiple payment options.
If you are selling worldwide, register your account in world renown payment gateways eg. PayPal, RBS Worldpay, etc. If you are selling locally (Eg. to Malaysia Only), it's recommended that you open an account with a local payment gateway services that accept local currency (Eg RM). Eg. if you are Malaysian merchant, you would want to register with iPay88, Nbepay or Commerce Payment.
Watch the below video tutorial on how to register & activate the payment services in webShaper Stores
- Setup PayPal to take online payment
 See Video
 - Setup iPay88 to take online payment
 See Video
 - Setup Offline Payment Mode to accept Cheque, Bank-in, COD
 See Video
![]() Tips: Learn more about PayPal (Sign up Free PayPal Business Account now) and iPay88
Tips: Learn more about PayPal (Sign up Free PayPal Business Account now) and iPay88
Step 5 - Setting up your Shipping Option
For every sales of tangible products from your online store, you need to ship the products to your customers. Before deciding on which shipping provider to go with, you are advised to conduct a research on shipping rates provided by different shipping providers to get the best deal possible.
Once you have made up your mind, grab the rate table, follow below "Create custom shipping option" to key in the shipping rates in “Shipping Management”.
![]() Tips: If you are selling worldwide, you are recommended to sign up with International Courier companies like UPS, Fedex, DHL, TNT etc. (It's NOT cheap, but it's highly reliable and trusted by your foreign clients) If you are selling locally, try local service providers like Poslaju, Skynet etc which is usually much more cost effective. See more at Courier Service Providers
Tips: If you are selling worldwide, you are recommended to sign up with International Courier companies like UPS, Fedex, DHL, TNT etc. (It's NOT cheap, but it's highly reliable and trusted by your foreign clients) If you are selling locally, try local service providers like Poslaju, Skynet etc which is usually much more cost effective. See more at Courier Service Providers
webShaper Stores has a comprehensive list of countries and states around the world. If you don't ship worldwide, then you might want to restrict the list of countries you ship to.
Also, the interface allows you to add states or provinces to countries. When your shoppers select a country which has pre-configured states, the shopper does not need to key in the name of the state but will instead select the relevant state. Hence, you are helping your shoppers to checkout more easily while shopping at your online store.
Activate Shipping Option in webShaper Stores:
- If you sign up with UPS, Activate UPS Online tools in webShaper stores (bizstore only)

- Select & manage the list of Countries & States you wish to cover in your shipping policy
 See Video
 - Easily manage by grouping Countries that share the same shipping rate into a single zone
 See Video
 - If you sign up with any other shipping providers, Create a custom shipping option in webShaper stores by following this example using POS Laju Malaysia
 See Video
Step 6: Configure Tax setting in your store
The “Tax Management” of webShaper stores helps calculate the taxes required to be imposed by your business on your shoppers from various locations. “Tax Management” of webShaper stores supports Goods & Services Tax (GST) in various countries such as Australia and Canada, Sales Tax in the United States, Provincial Sales Tax (PST) and Harmonized Sales Tax (HST) in Canada.
In webShaper Stores, taxes can be imposed across a few countries and states. If you have different tax rates for different cities, webShaper e-commerce allows you to define rate for each city.
- 3-in-1 Tax Setting Creator: Use this if you need to impose only one tax rate

- Multiple Tax Setting Creator: Use this if you need to impose more than one tax rate

![]() Note: Malaysia Merchants can ignore GST until its initial implementation by mid of 2011. Understand more about GST (A consumption Tax) & How GST Affects Malaysia SMEs.
Note: Malaysia Merchants can ignore GST until its initial implementation by mid of 2011. Understand more about GST (A consumption Tax) & How GST Affects Malaysia SMEs.
Step 7: Customize Auto-Reply Email Templates
Whenever there is an order being Received, Confirmed, Shipped or Cancelled, an email will be sent out to your customers from webShaper stores. The templates and contents of these emails can be customized within webShaper stores. The e-mails templates must be properly customized before launching of your online store.
- Customize email templates for auto-reply email
(Order Received / Confirmed / Shipped / Cancelled) See Video
![]() Tips: Be sure to place some Test Orders in your store using your own email to make sure the reply email looks and works the way you want it.
Tips: Be sure to place some Test Orders in your store using your own email to make sure the reply email looks and works the way you want it.
Step 8: Activate your Marketing Tools & Promoting Your Store Online
Promotion will lead to more sales. You can promote your store by using online marketing strategies like Search Engine Optimization (SEO), Email Marketing, Social Media Marketing (via Facebook Page / Group or Twitter), Banner Advertisements, Affiliate Marketing etc.
Your promotion activities should focus on reaching out to your targeted market (Who is the buyer? What websites do they surf? What keywords they will search for when they think about your products? )
- Get More Repeat Sales or Encourage New Purchase by using Discount Code
 See Video
 - Boost your sales using Affiliate Marketing
- Affiliate Part 1: Setup affiliate plan to accept affiliate partner registration
 See Video
 - Affiliate Part 2: Let your affiliate partner easily promote your products!
 See Video
 - Reward your customer by giving them Discount code using built-in SMS function
 See Video
 - Encourage your customers to buy more using Quantity Discount (Bulk Discount)
 See Video
 - Let's shopper automatically fetch your best sellers, new products & promotion into their favourite RSS feed readers
 See Video
 - Get your store listed in Google Product Search

- Featured your products on your home page and make it a central attraction
 See Video
 - Highlight new arrival products to your shoppers
 See Video
 - Highlight best selling products on your store front page
 See Video
 - Sell more online by offering special discount
 See Video
Step 9: Build Trust by Creating Pages about your Online Store
Trust is hard to build - and easy to lose. This is especially true for an online business, where your clients will likely never see you in-person or be able to trade in cash. The first thing you must do is to let your clients know how you run your business.
- Create Static Pages (FAQs, Contacts, Shipping Policy, Payment Methods etc).
 See Video
![]() Tips: Have a professional looking stores is crucial in building trust. Check out Top 10 ways to build trust for your online stores.
Tips: Have a professional looking stores is crucial in building trust. Check out Top 10 ways to build trust for your online stores.
Step 10: Time to Go live!
Now, your online store is almost ready to launch. Run through the Go Live Checklist and of course don't miss out our marketing centre where we have prepared a lot of useful articles on how to drive traffic and and promote your online stores to get the sales in!
Need Assistance?
If you have any further questions about webShaper just shoot us an email and we’ll get back to you within a few hours.
If you have NOT received a response, please double check that you don't have any SPAM Filters installed which are blocking our replies to you. To resolve this, just add our email to your contact list



 Sales: +603 9130 5218
 Contact Us
